Welcome to CoTrainer
CoTrainer is a structured performance consulting tool that helps you figure out what’s really going on before you build training, write a job aid, or escalate a people problem. This Help Center walks you through every step of the workflow.
Start here
Questions? Email jason@blueedgewater.com — we’re happy to help.
How CoTrainer Works
CoTrainer gives you the workflow of a performance consultant in your pocket. It doesn’t jump to solutions — it helps you understand the problem first, then builds a complete consulting package around what you find.
Navigating the app
The bottom navigation bar has six tabs. Start at DIAGNOSE every time — it’s always home base.
- DIAGNOSE — run a Quick Diagnosis or Guided Discovery. Tap the Guide button (top right) to see the full workflow diagram.
- SAVED — all your diagnoses, projects, briefs, and cadences. Return here to continue any engagement.
- ENVIRON — six BEM-cell environmental intervention flows for when the diagnosis finds a non-training cause.
- BUILD — eight training asset builders: Job Aid, Microlearning, Scenario, Needs Analysis, Observation Checklist, Course Blueprint, Kirkpatrick Evaluation, Training Calendar.
- GLOSSARY — 99 plain-language definitions with workplace examples for every concept in the app.
- PROFILE — spark balance, plan status, and option to replay onboarding.
Sparks — your usage currency
CoTrainer uses sparks instead of a feature paywall. Every AI action costs sparks:
- Quick Diagnosis ⚡ 1
- Training Builder draft ⚡ 1
- Environmental (BEM) flow ⚡ 1
- Add More Context / Redraft ⚡ 1
- Leadership Brief ⚡ 2
- Guided Discovery with Morgan ⚡ 3
Free: 8 sparks Day 1, then 5 per day. Pro: 200 sparks/month at $5.99/month or $49.99/year.
The four-stage workflow
Every engagement starts with a diagnosis. The diagnosis drives the brief. The brief’s Role Analysis tab produces the cadence. The cadence tells you what to build first. Everything stays organized in a named project.
Quick Diagnosis
Five structured questions grounded in Gilbert’s Behavior Engineering Model. Takes about 3 minutes. Produces a root-cause analysis, confidence score, and build plan. ⚡ 1 spark
When to use
Choose Quick Diagnosis when you have a reasonably clear picture of the situation — you know what people should be doing and what’s going wrong. If the problem is still fuzzy, try Guided Discovery instead.
Step 1Tap Quick Diagnosis from the DIAGNOSE tab
From the DIAGNOSE tab (bottom left), tap the dark green Quick Diagnosis card.
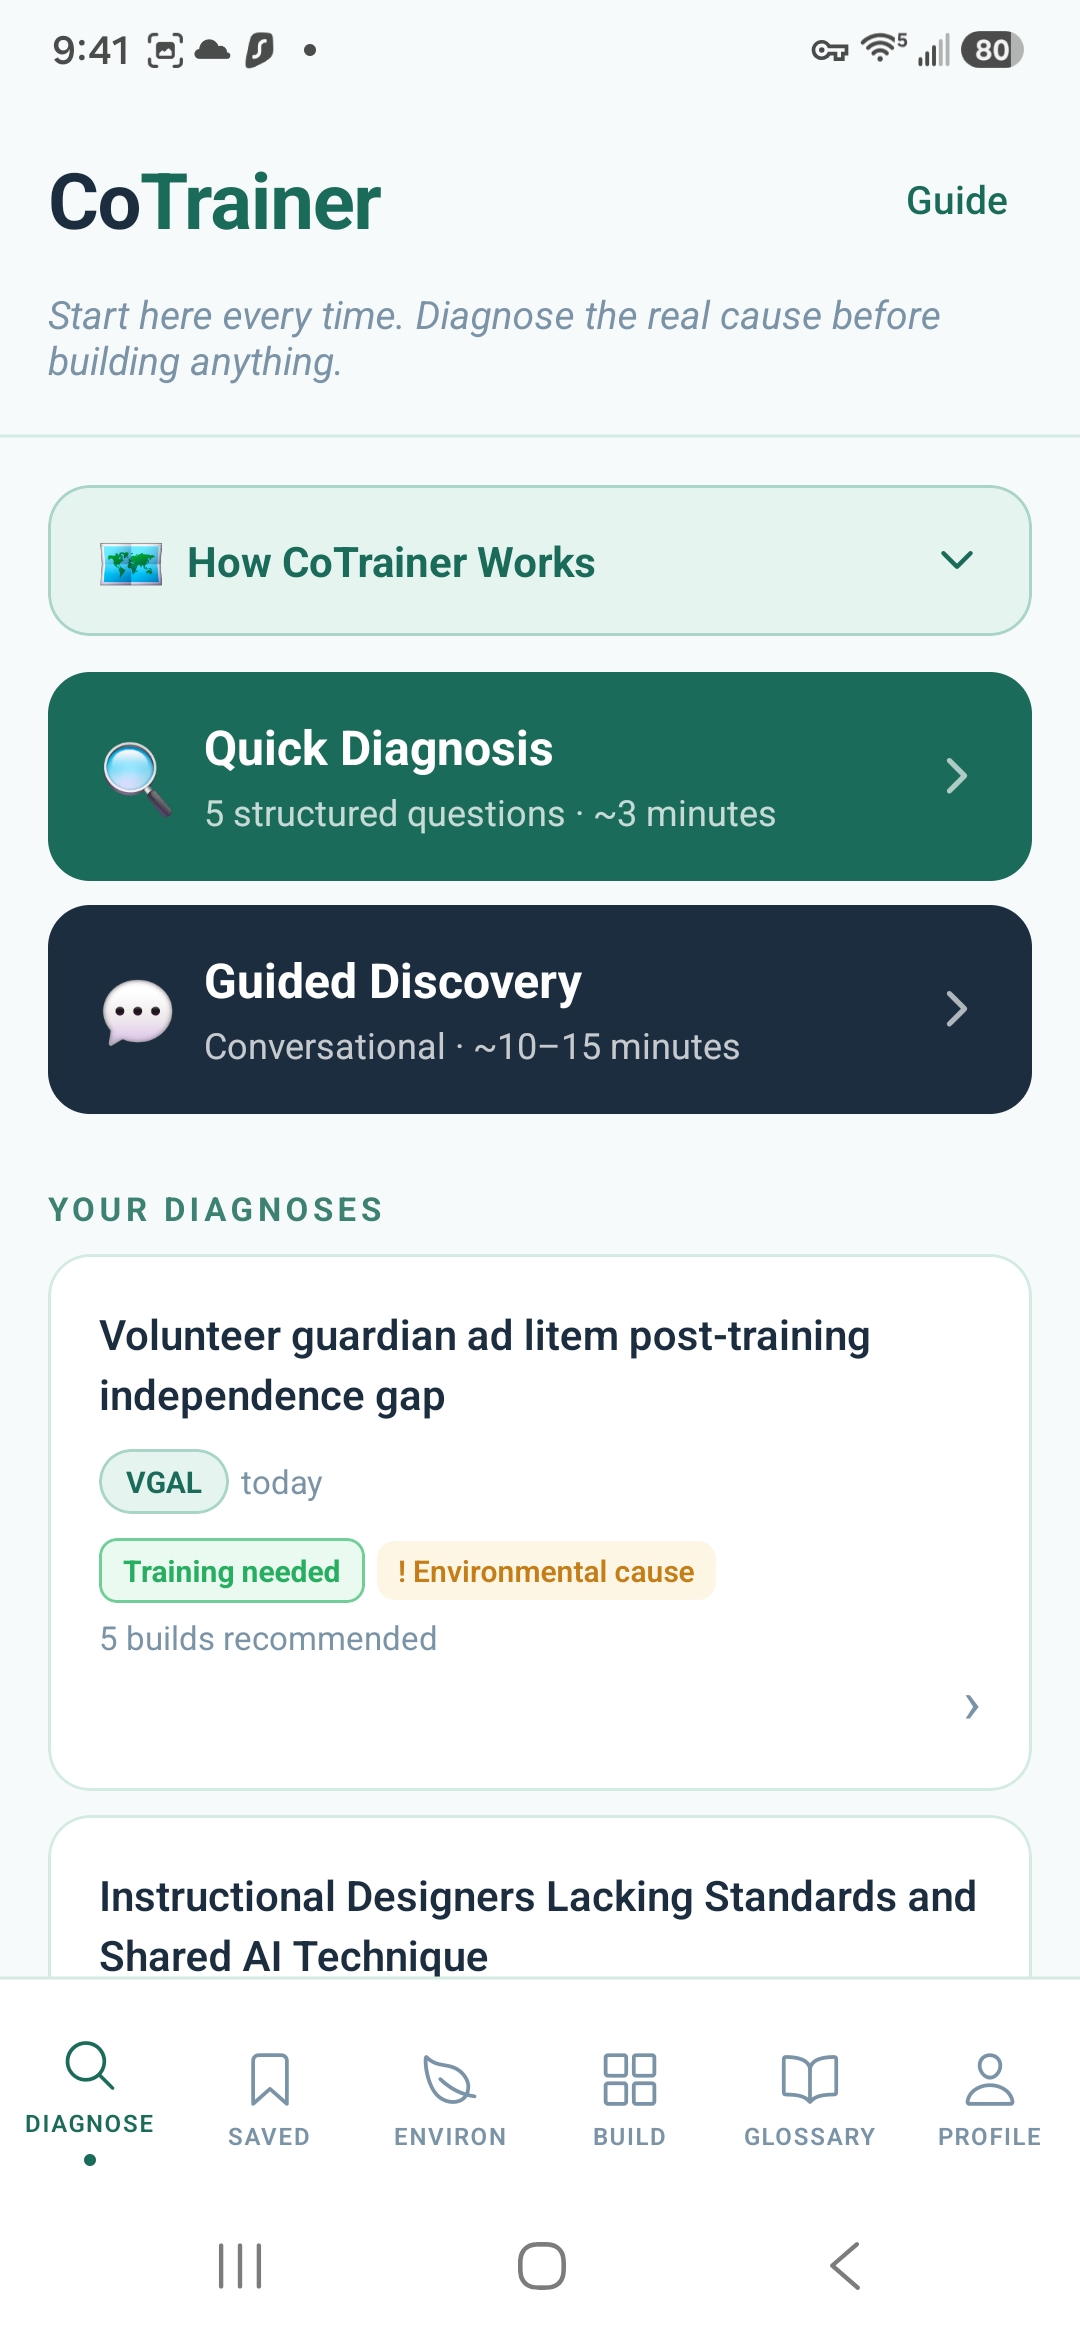
Quick Diagnosis (teal) for structured, fast input. Guided Discovery (navy) for messy, unclear situations.
Tap Guide top right for the full workflow diagram. Your past diagnoses appear below the two cards.
Step 2Answer the five questions honestly
Write in plain language — conversational and specific beats formal and vague. CoTrainer handles the analysis.
- What’s the performance gap? What should people be doing vs. what are they actually doing?
- What do people know? Do they have the knowledge and skills to perform?
- What does the environment support? Clear expectations, tools, resources, feedback?
- What are the consequences? What happens when people perform well — or poorly?
- What’s your confidence level? How much do you actually know vs. what’s still assumed?
Step 3Review your diagnosis and save to a project
CoTrainer generates a root-cause analysis, confidence score, and recommended build plan. See Reading Your Diagnosis for a full breakdown, then save to a project to start building.
Guided Discovery with Morgan
A conversational diagnosis where Morgan — CoTrainer’s AI performance guide — interviews you through the problem until the real cause becomes clear. Grounded in Schein’s Humble Inquiry, Motivational Interviewing, Systems Thinking, and Appreciative Inquiry. ⚡ 3 sparks
When to use
Choose Guided Discovery when the situation is still fuzzy, you’re not sure whether it’s a training issue or something environmental, you’ve run a Quick Diagnosis but the answers felt shallow, or you want the depth of an external consultant without the cost.
Step 1Tap Guided Discovery from the DIAGNOSE tab
Tap the dark navy Guided Discovery card. Subtitle reads Conversational · ~10–15 minutes.
Step 2Describe the mess in your own words
Morgan opens with: “Tell me what’s going on, in your own words. Don’t worry about organizing it — just describe the situation as it actually feels right now.”
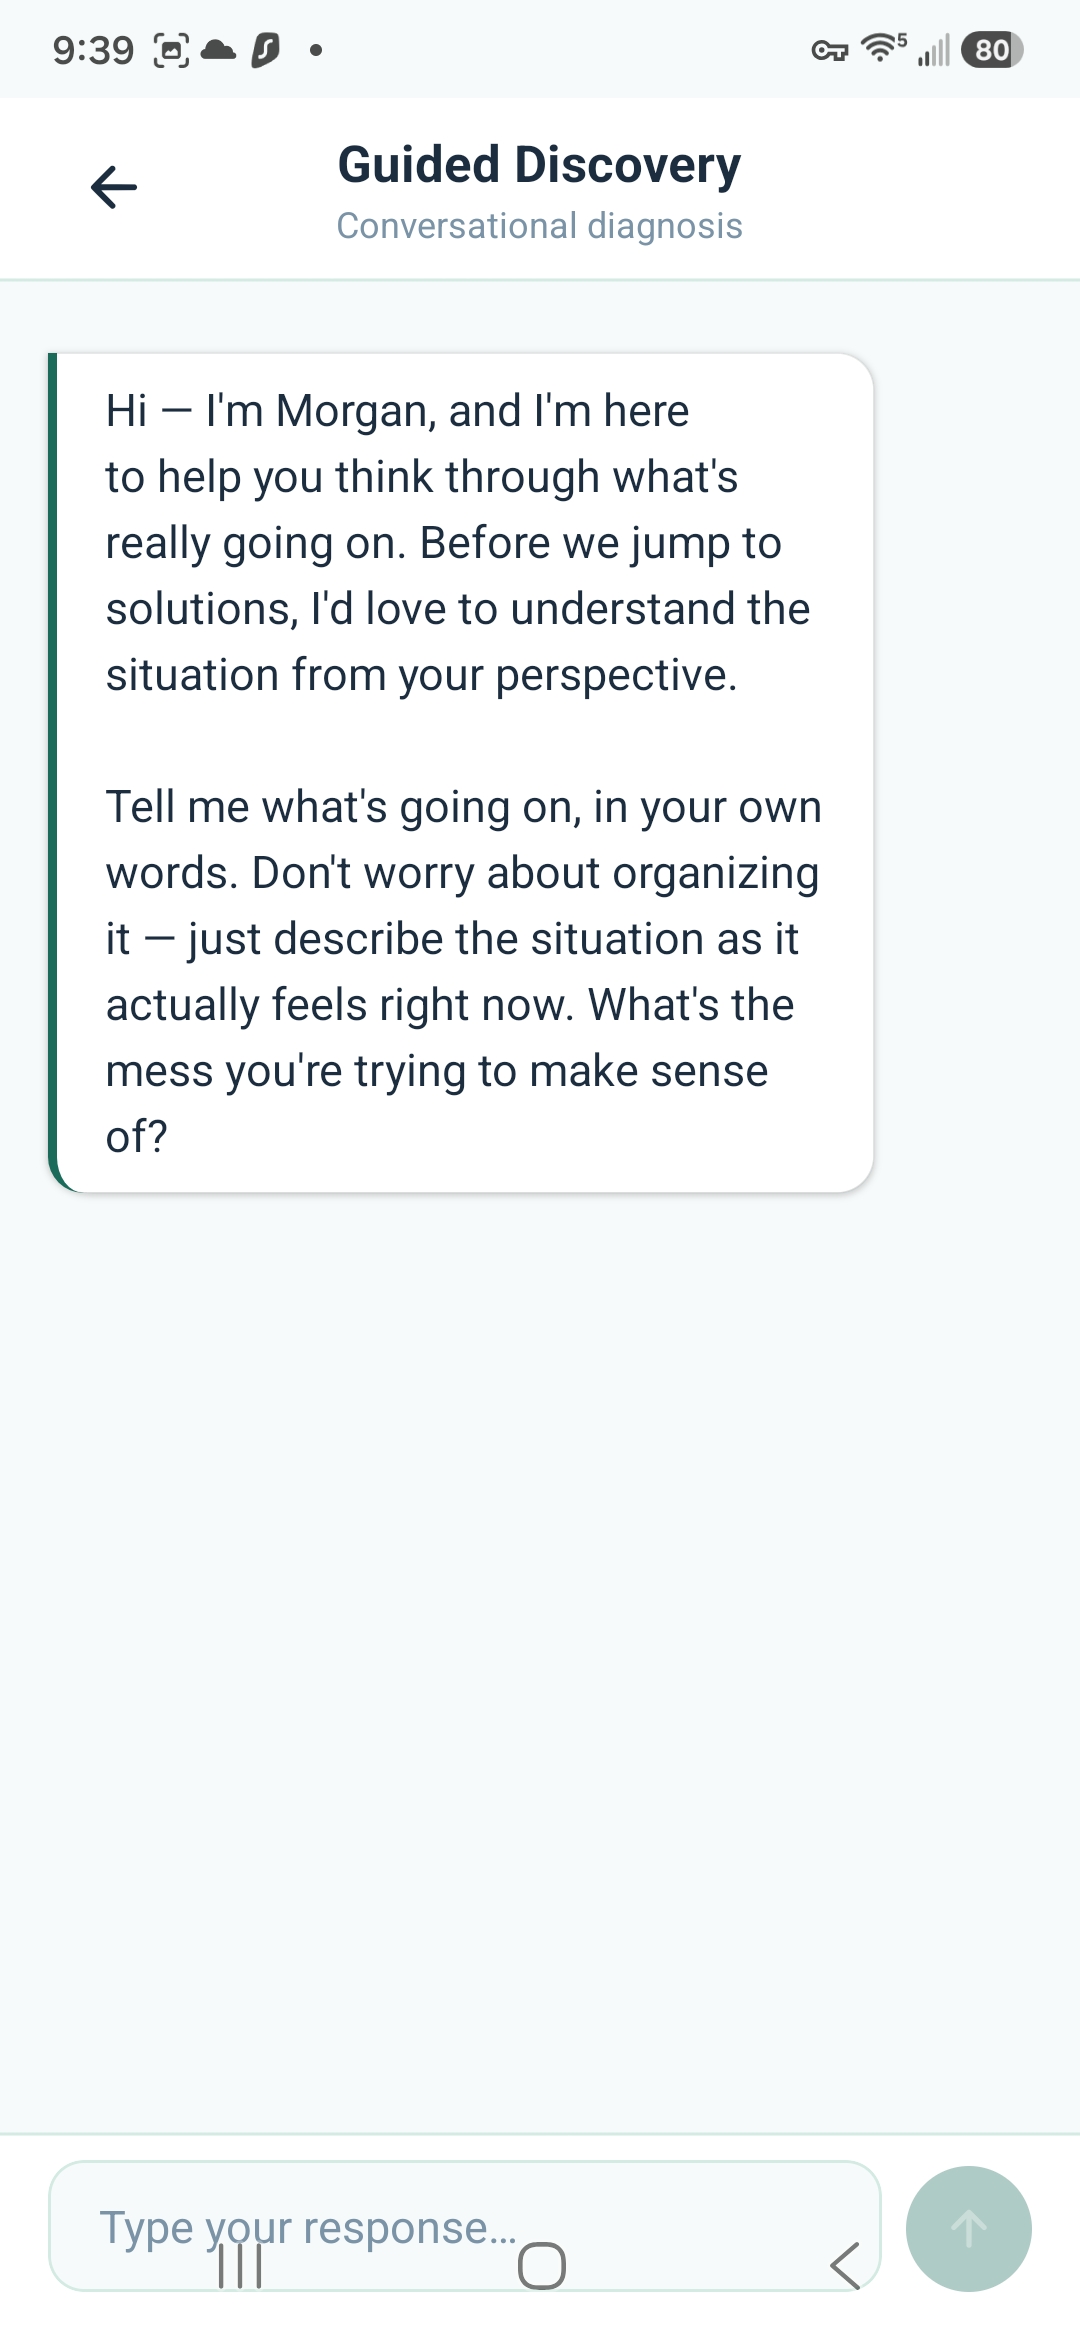
The less polished your first message, the better — Morgan is designed for problems you haven’t figured out yet.
Type in the box at the bottom and tap the green send button.
Step 3Answer Morgan’s follow-up questions
Morgan asks what a skilled performance consultant would ask — what people are doing instead, what the environment enables or prevents, what happens when things go right or wrong, what you still don’t know. “I’m not sure” is a legitimate and useful answer.
Step 4Review and save the diagnosis
When Morgan has enough to work with, it produces the same structured output as Quick Diagnosis. Save to a project to continue. If the conversation surfaced something new, add more context to sharpen the picture further.
Reading Your Diagnosis
After running a Quick Diagnosis or Guided Discovery, CoTrainer produces a structured output page. Here’s what every section means and what to do with it.
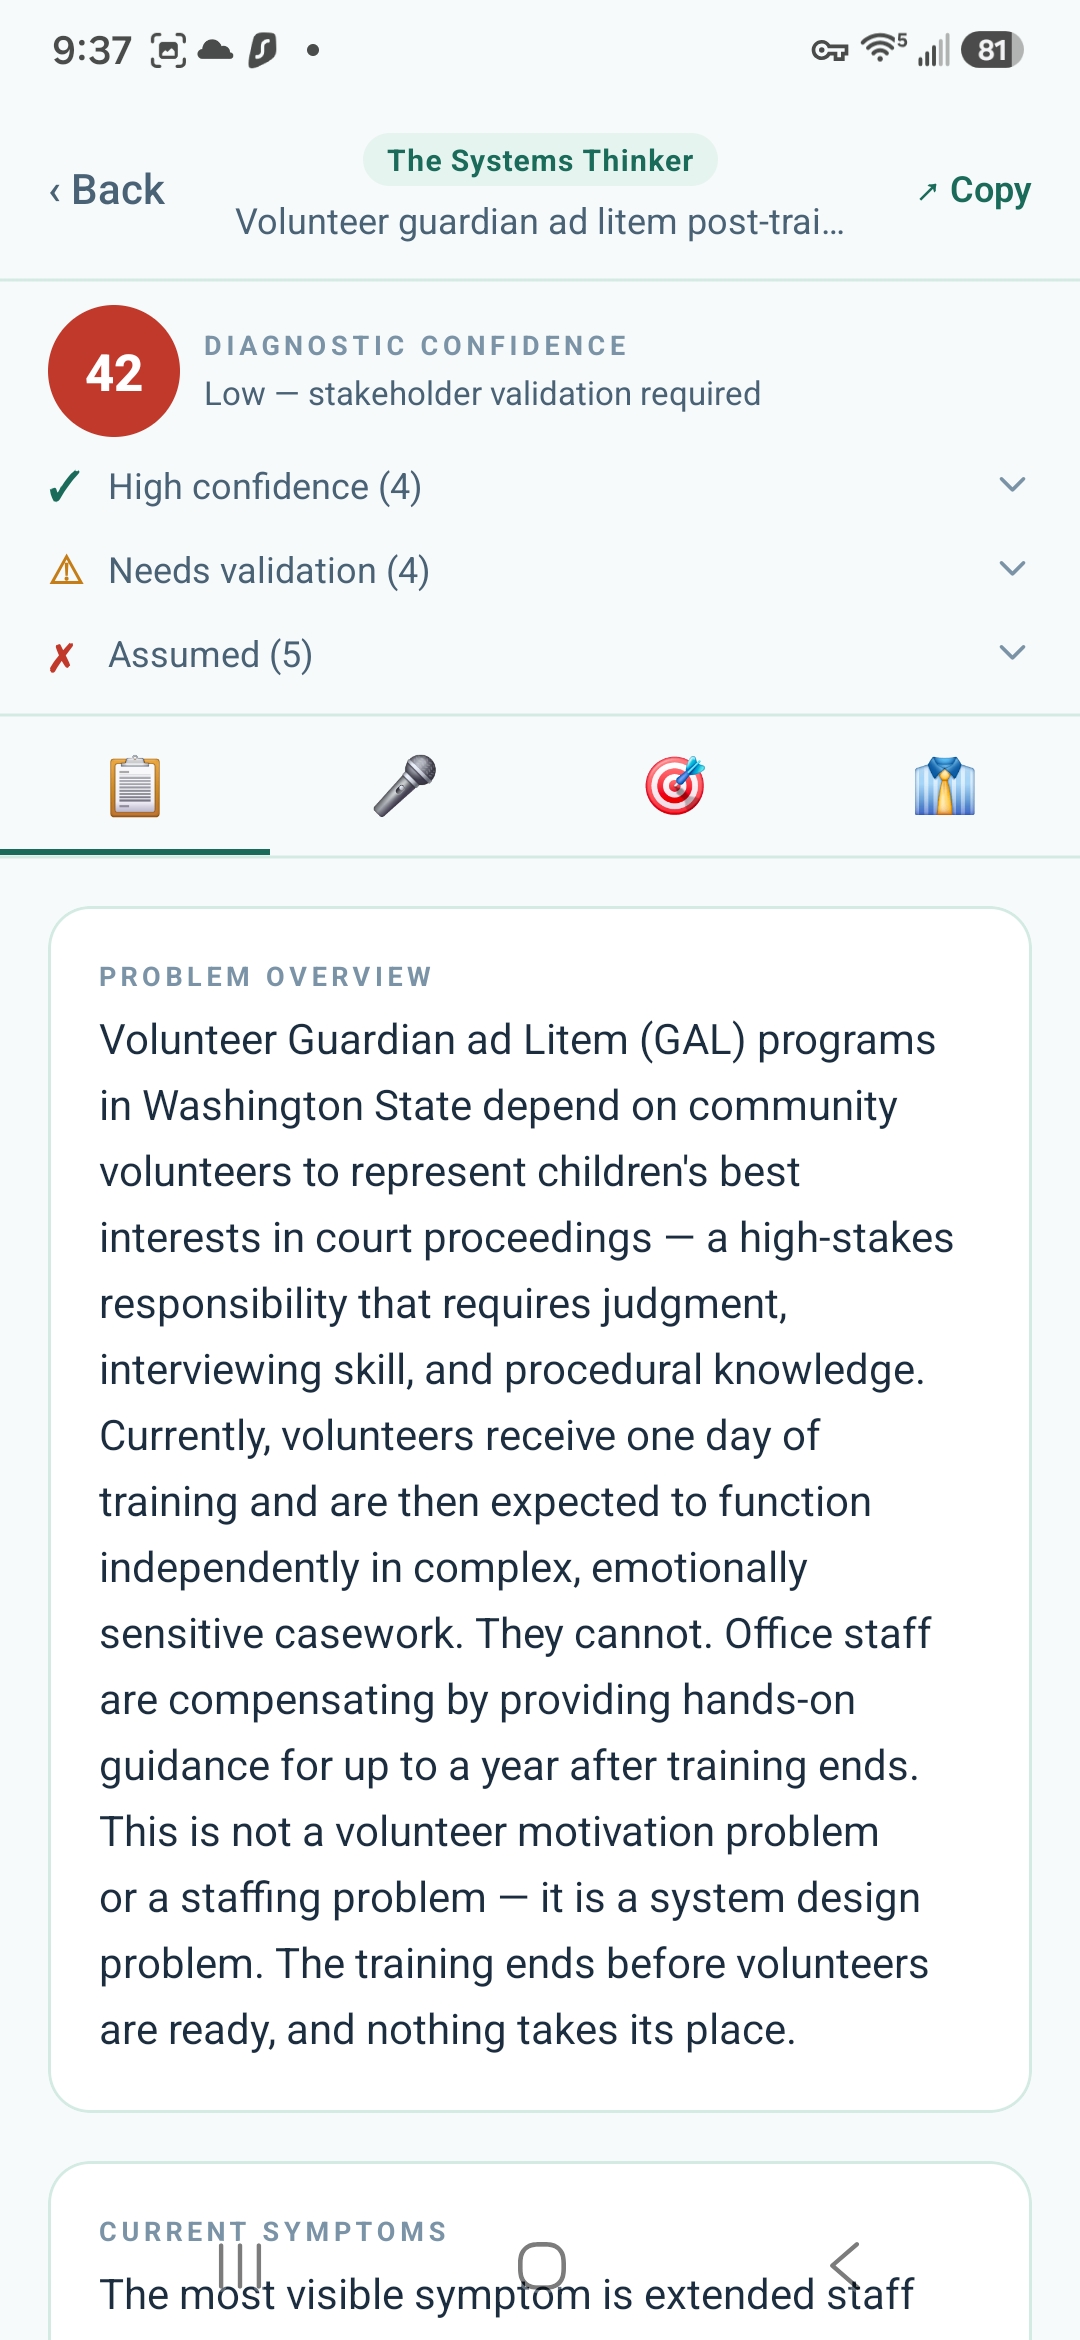
Section 1The Diagnostic Confidence Score
The circle at the top shows a number 1–100. This is how much evidence supports the analysis based on what you’ve shared so far.
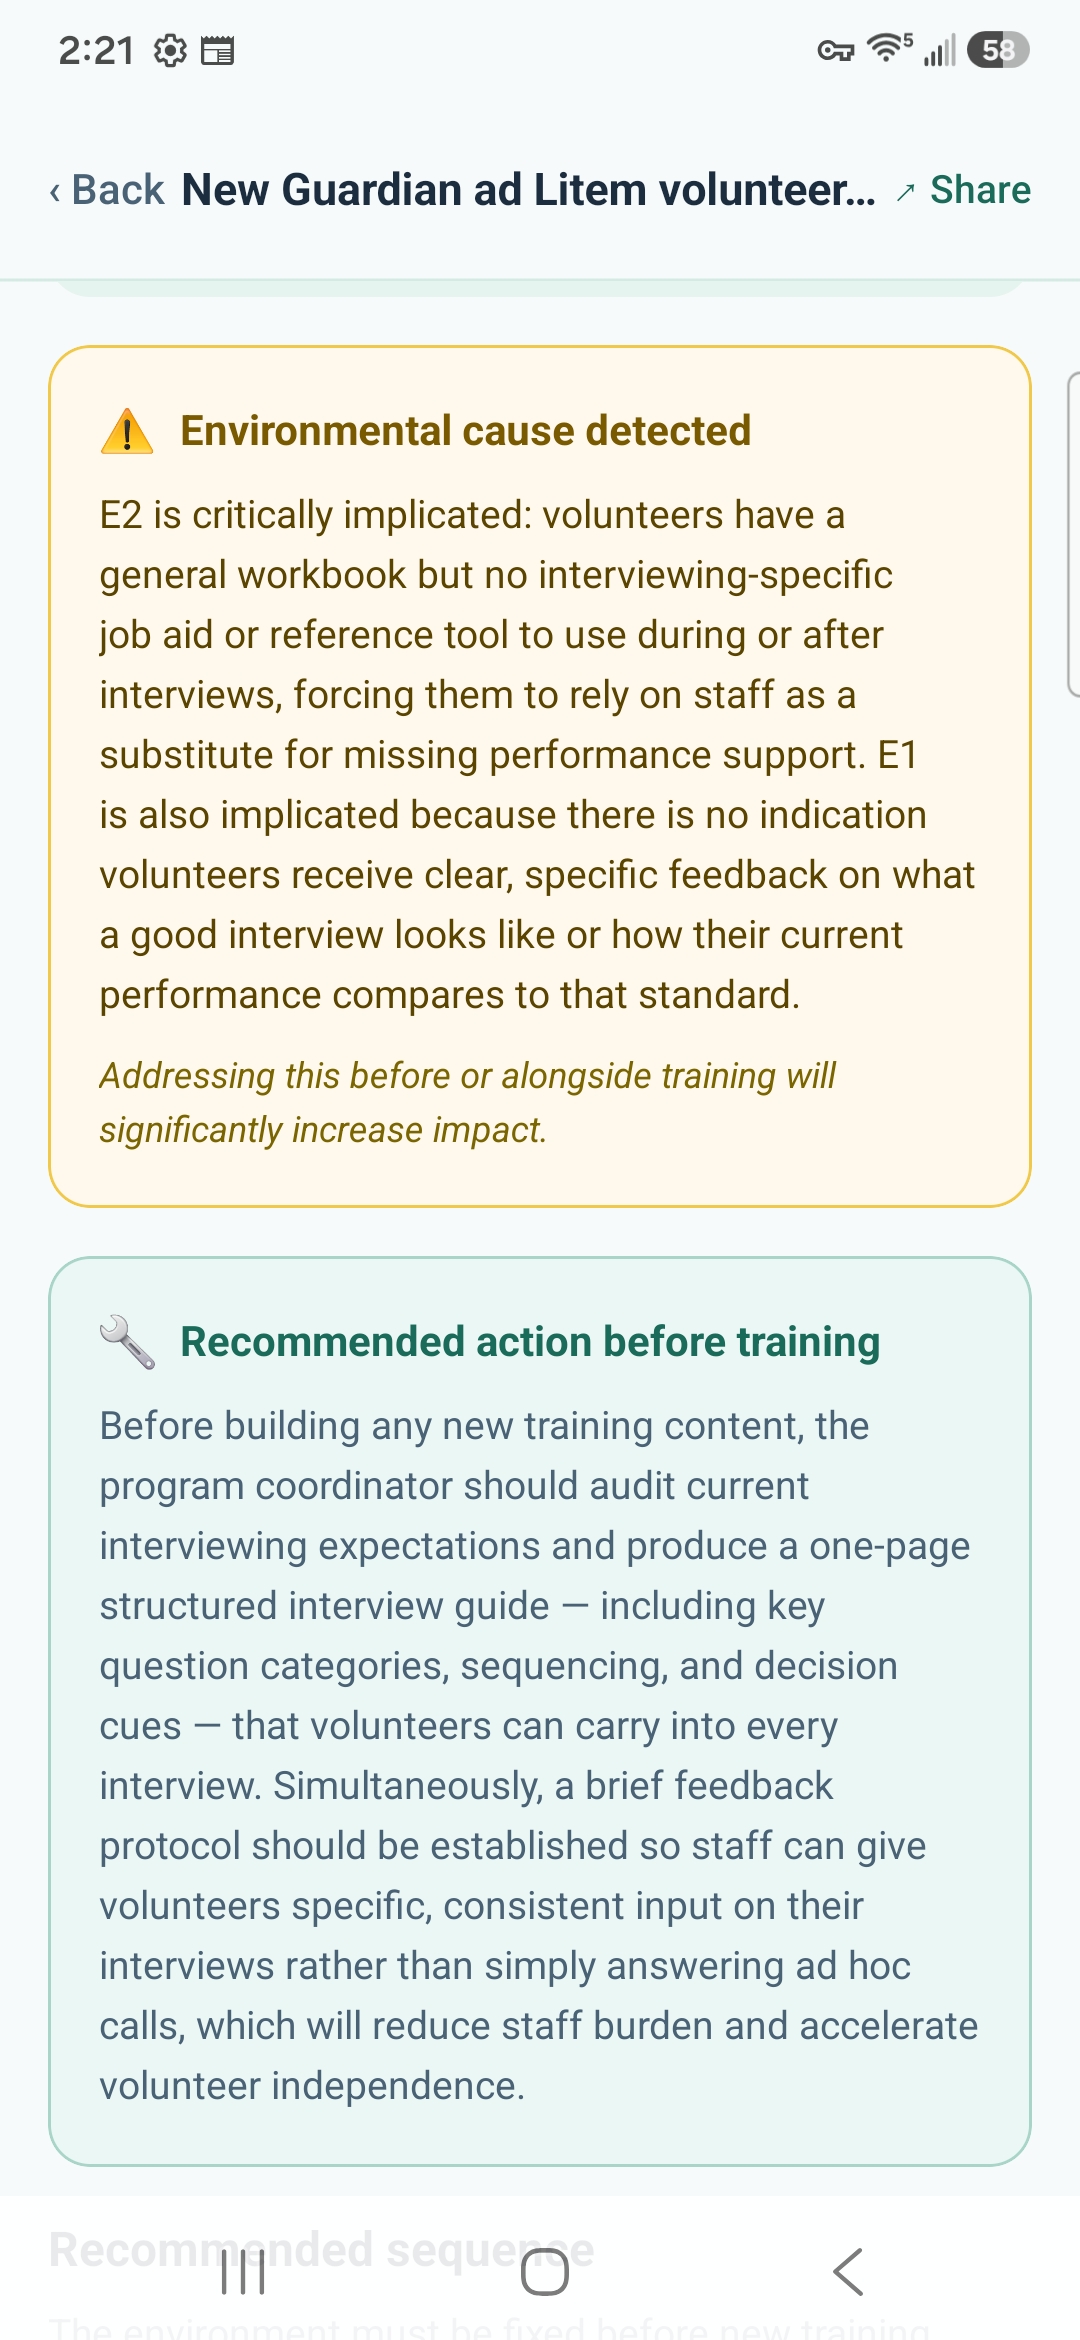
The amber “Environmental cause detected” banner flags that the root cause is outside the individual — fixing training alone won’t solve it.
Below the score, three expandable rows show what’s High confidence ✓, Needs validation ⚠, and still Assumed ✗. Tap each to expand.
- 70–100: High confidence — enough to act on
- 40–69: Medium — validate key assumptions before presenting to leadership
- Below 40: Low — run the Stakeholder Interview Guide before committing resources
Section 2The diagnosis output sections
Scroll below the confidence score to see the full diagnosis in plain language. Key sections: Problem Overview, Current Symptoms, Root Cause Analysis (which BEM cells are implicated), and What To Do Next — four action cards with recommended first steps.
Section 3Bottom of the diagnosis — action buttons

Start Building → — jump straight to the recommended first builder.
Generate Leadership Brief — the recommended Step 1. Produces all 4 consulting documents. ⚡ 2
Add More Context — use when you have new information from interviews or observation. Sharpens the confidence score. ⚡ 1
Scroll further to find Re-run Diagnosis for a fresh pass with updated inputs.
Adding Context & Re-diagnosing
A diagnosis gets better as you learn more. CoTrainer gives you three ways to sharpen it — each suited to a different situation.
Option AAdd More Context to the existing diagnosis
After stakeholder interviews or on-the-ground observation, tap Add More Context at the bottom of the diagnosis screen. ⚡ 1 spark Describe what you learned — CoTrainer re-analyzes and updates the confidence score and findings. Use this when you have new information that changes specific assumptions, not the whole picture.
Option BRe-run the diagnosis with updated information
Tap Re-run Diagnosis (below the action buttons) or return to the DIAGNOSE tab and start fresh — this time with everything you now know baked into your answers. Save the new diagnosis to the same project. Both live side by side so you can see how the analysis evolved.
Option CGenerate a new brief with a different advisor voice
From the same diagnosis, generate a second Leadership Brief using a different advisor voice. Same diagnosis — completely different framing, priorities, and recommendations. Useful when presenting to different audiences or when you want a second analytical opinion on the interventions.
Choosing an Advisor
Before generating a Leadership Brief, CoTrainer asks which advisor voice to use. This is one of the most important choices in the app — the same diagnosis produces a fundamentally different brief depending on which learning science lens you choose.
Why it matters
A Behaviorist brief leads with observable performance standards and reinforcement architecture. A Systems Thinker brief leads with Level 4 business outcomes and the LTEM transfer chain. A Rapid Builder brief treats everything as Version 1.0 and optimizes for speed. None is wrong — they serve different problems, audiences, and organizational cultures.
Take a moment to read each description — it’s worth choosing deliberately rather than defaulting to the first option.
Free voices are available on all plans. Pro voices require a Pro subscription.
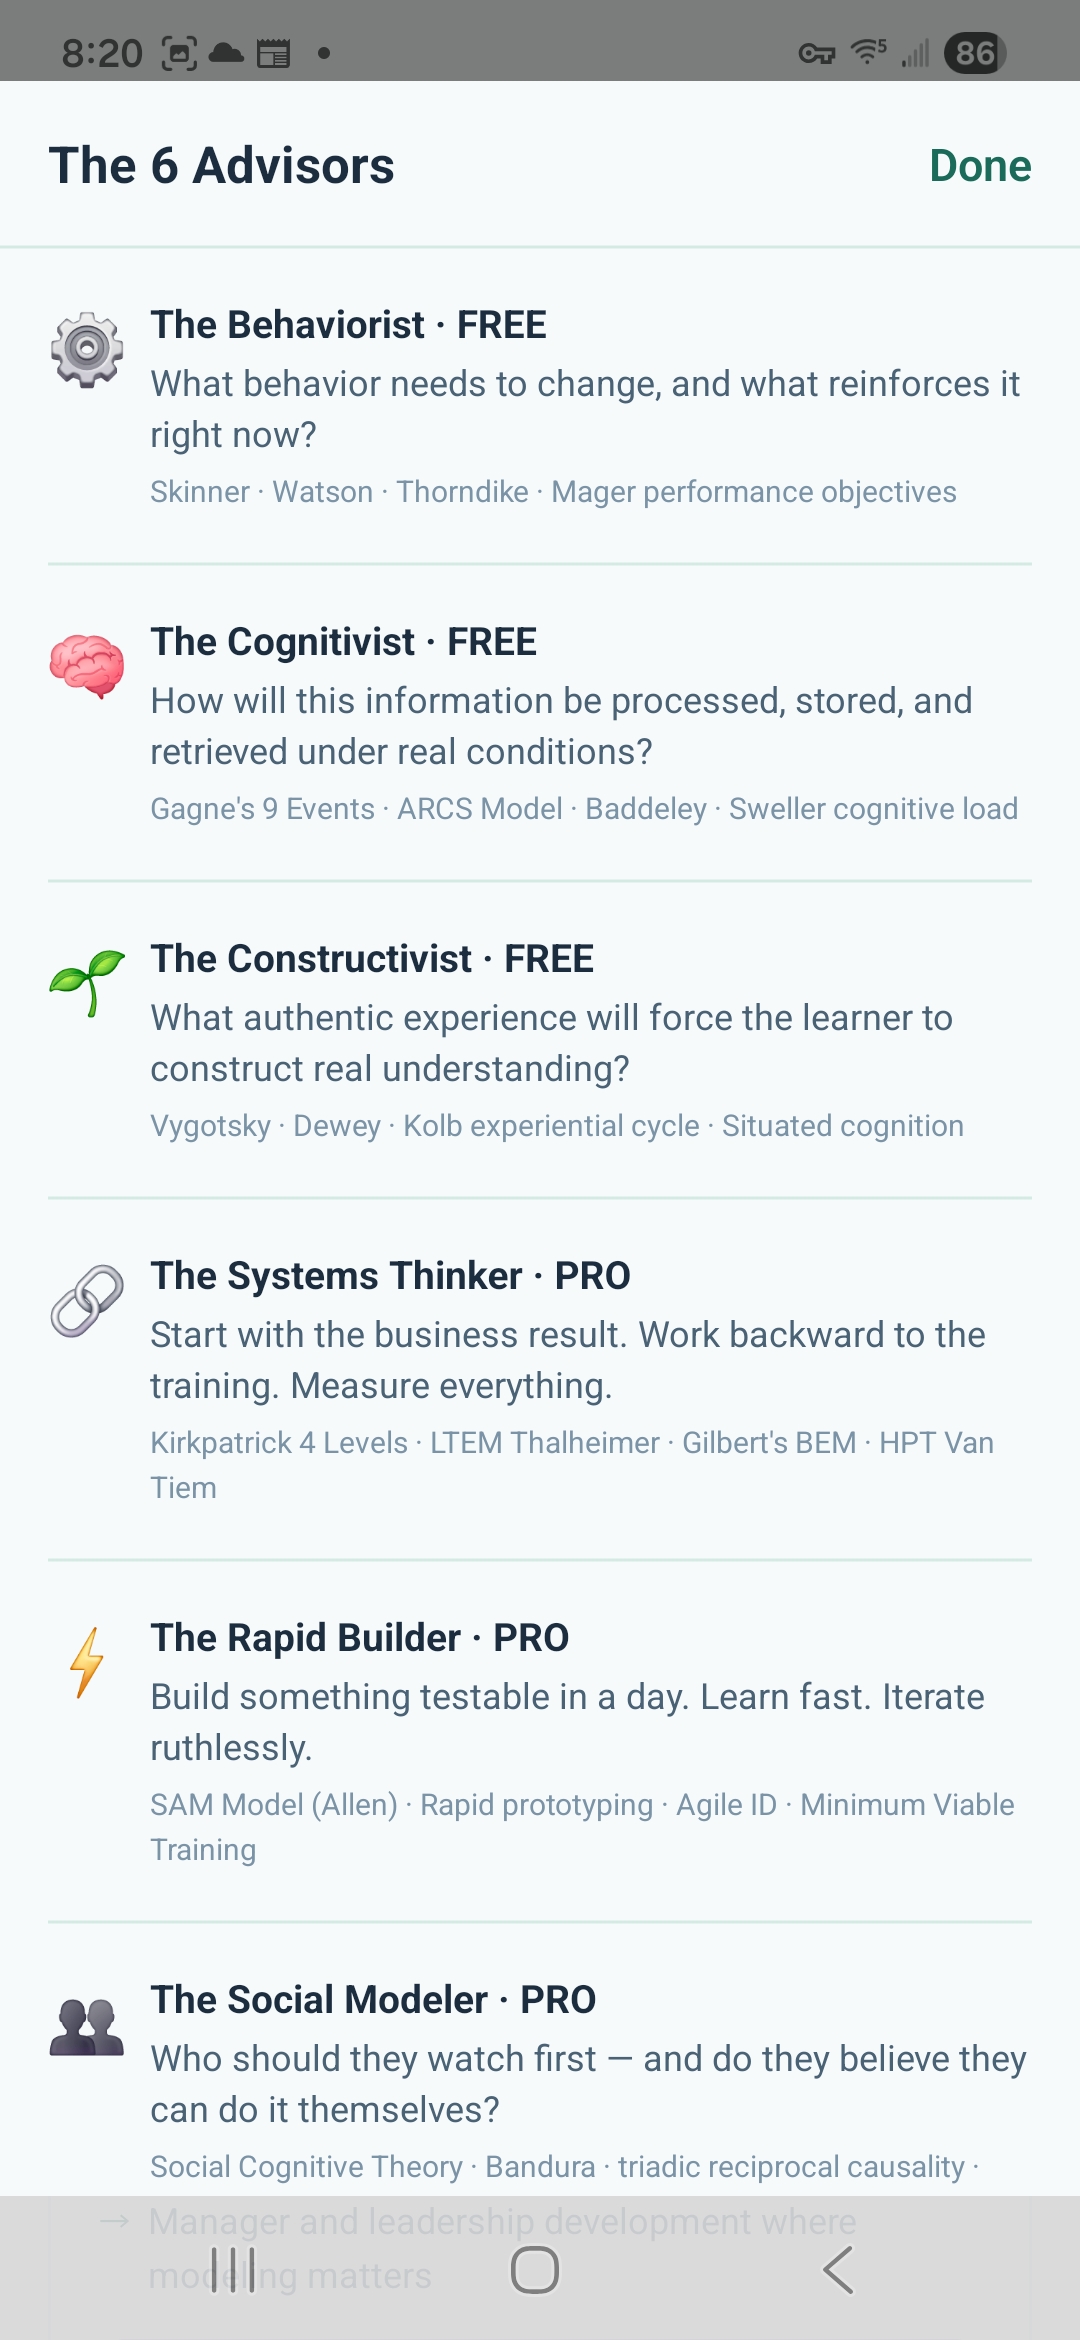
Free advisor voices
The Behaviorist
FreeSkinner · Watson · Mager performance objectives. Leads with observable behavior change and reinforcement architecture. Best for: clear skill gaps, frontline performance, measurable behavior targets.
The Cognitivist
FreeGagné’s 9 Events · ARCS Model · Sweller cognitive load. Best for: complex knowledge work, instruction that isn’t sticking, learning design challenges.
The Constructivist
FreeVygotsky · Kolb experiential cycle · Situated cognition. Best for: judgment-based gaps, experiential learning, messy real-world performance contexts.
Pro advisor voices
The Systems Thinker
ProKirkpatrick 4 Levels · LTEM Thalheimer · Gilbert’s BEM. Backward design from Level 4 outcomes. Best for: executive audiences, strategic briefs, when business impact must be the headline.
The Rapid Builder
ProSAM Model (Allen) · Rapid prototyping · Minimum Viable Training. Every output is Version 1.0. Best for: fast-moving orgs, when speed of validation matters more than completeness.
The Social Modeler
ProSocial Cognitive Theory · Bandura · triadic reciprocal causality. Best for: culture gaps, confidence and motivation issues, social performance problems.
Using multiple advisors on the same problem
This is one of the most powerful features in CoTrainer and the one most users miss. Generate a brief with The Systems Thinker for your executive director — it leads with Level 4 language they’ll recognize. Generate a second with The Behaviorist for your training team — they can act on it immediately. Use The Rapid Builder when leadership wants something by Friday.
Both briefs live in the same project. You’re not choosing one truth — you’re choosing which lens serves which conversation.
The 4 Brief Tabs
Four professional consulting documents generated in parallel from your diagnosis. Takes 60–90 seconds. Each tab serves a different audience and a different purpose. ⚡ 2 sparks
The confidence score and findings carry over from the diagnosis. Tap Copy (top right) to copy the full brief to your clipboard.
Tab 1📋 Executive Summary
A leadership-ready narrative analysis structured for executives and senior managers. Includes: problem overview, current symptoms, root cause findings, environmental factors, recommended actions, risks of inaction, and a confidence note. The advisor voice shapes the language and priorities throughout.
Tab 2🎤 Stakeholder Interview Guide
Diagnosis-specific questions for four stakeholder groups: executives, managers, performers, and SMEs. Each question is tailored to validate or challenge the specific assumptions in your diagnosis. Also includes a checkable evidence request list and the key assumptions needing validation before committing resources.
Tab 3🎯 Intervention Scorecard
All 24 performance interventions from Stolovitch & Keeps’ Training Ain’t Performance scored 1–5 for your specific situation. The top 5 include concrete “What To Do” implementation actions — not generic advice. Training only scores 4–5 when a genuine knowledge gap is confirmed.
Tab 4👔 Role Analysis + Consulting Cadence
Six performance consultant roles (Performance Analyst, Instructional Designer, Change Manager, Project Manager, Evaluator, Performance Consultant) allocated as percentages for your situation — with situation-specific task lists and sequence-of-work guidance.
This is also where you create the Consulting Cadence. Scroll to the bottom of this tab to find the button. See Consulting Cadence for the full guide.
Consulting Cadence
The Consulting Cadence takes the Role Analysis percentages from Tab 4 and turns them into a concrete week-by-week accountability plan — who does what, in what sequence, with which team member responsible.
What it produces
A role analysis saying “40% Performance Analyst” is abstract. The cadence turns that into “Weeks 1–2: conduct stakeholder interviews, document current state, map BEM findings to specific environmental conditions.” Concrete and sequenced.
Step 1Open Tab 4 of the Leadership Brief
The Consulting Cadence is only accessible from the 👔 Role Analysis tab (Tab 4). Open your brief from the Saved tab or project, tap the 👔 tab, and scroll to the bottom.
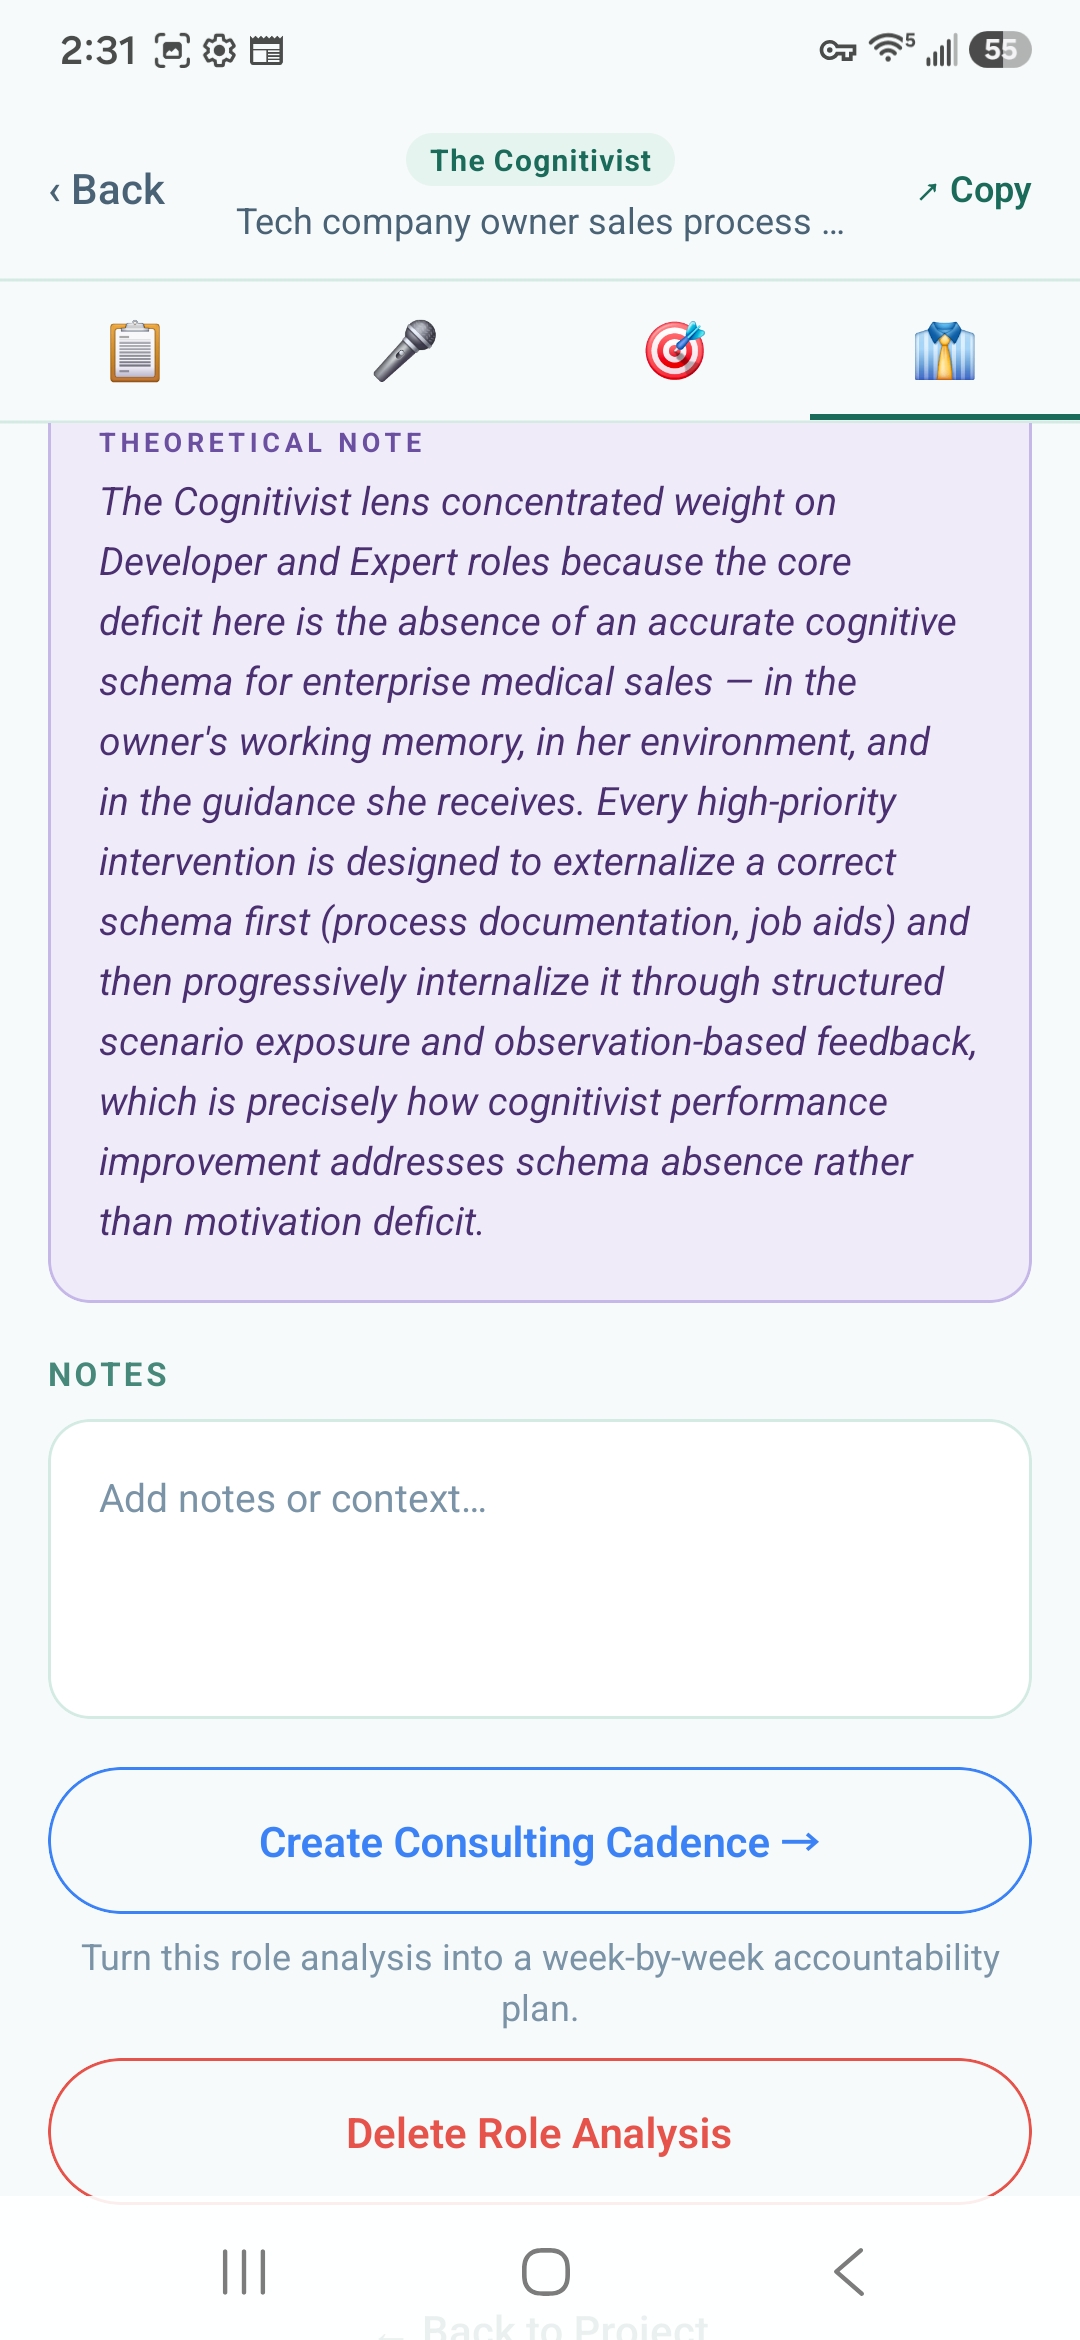
The Theoretical Note above it explains why the advisor’s lens weighted the roles the way it did — useful context before creating the cadence.
Step 2Generate and review the week-by-week plan
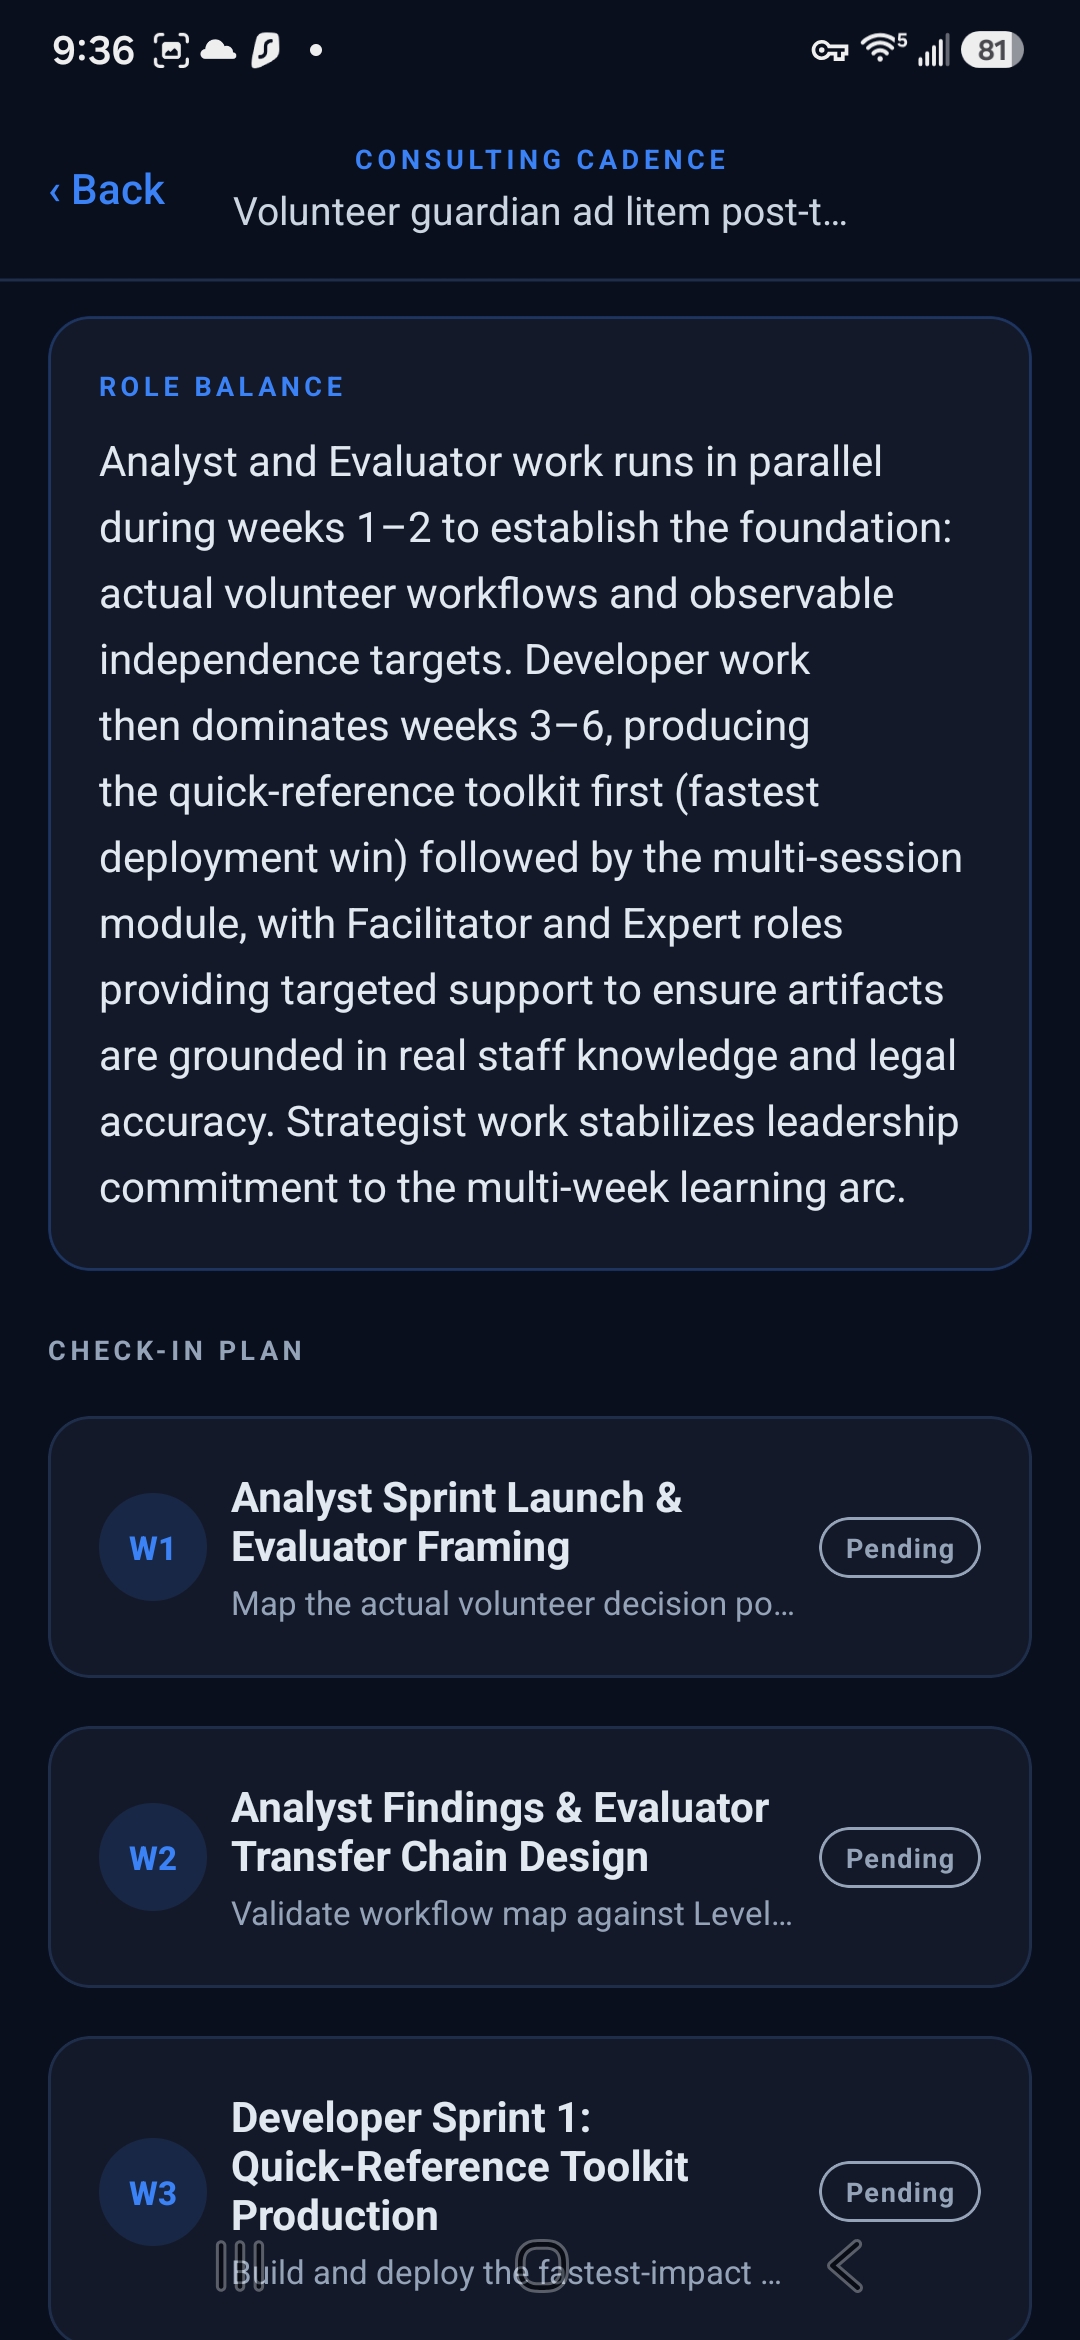
Each week card shows the primary role that week, the specific task, and the team member best suited to lead it.
Status starts as Pending — tap each week to mark progress.
Step 3Save and revisit
Tap Save Cadence. It appears in the Saved tab linked to the brief it came from, with created date and last-opened timestamp. From your project view, saved cadences appear alongside briefs and builds.
Saving to a Project
Projects are how CoTrainer keeps everything organized. When you save a diagnosis to a project, CoTrainer auto-populates a Build Plan — a sequenced checklist of every recommended deliverable. This is how a diagnosis becomes action.
Step 1Name and save your project
After running a diagnosis, save it and give the project a specific name that identifies the situation: “VGAL volunteer onboarding gap” or “Q3 new system adoption — ops team.”
Step 2Review your auto-populated Build Plan
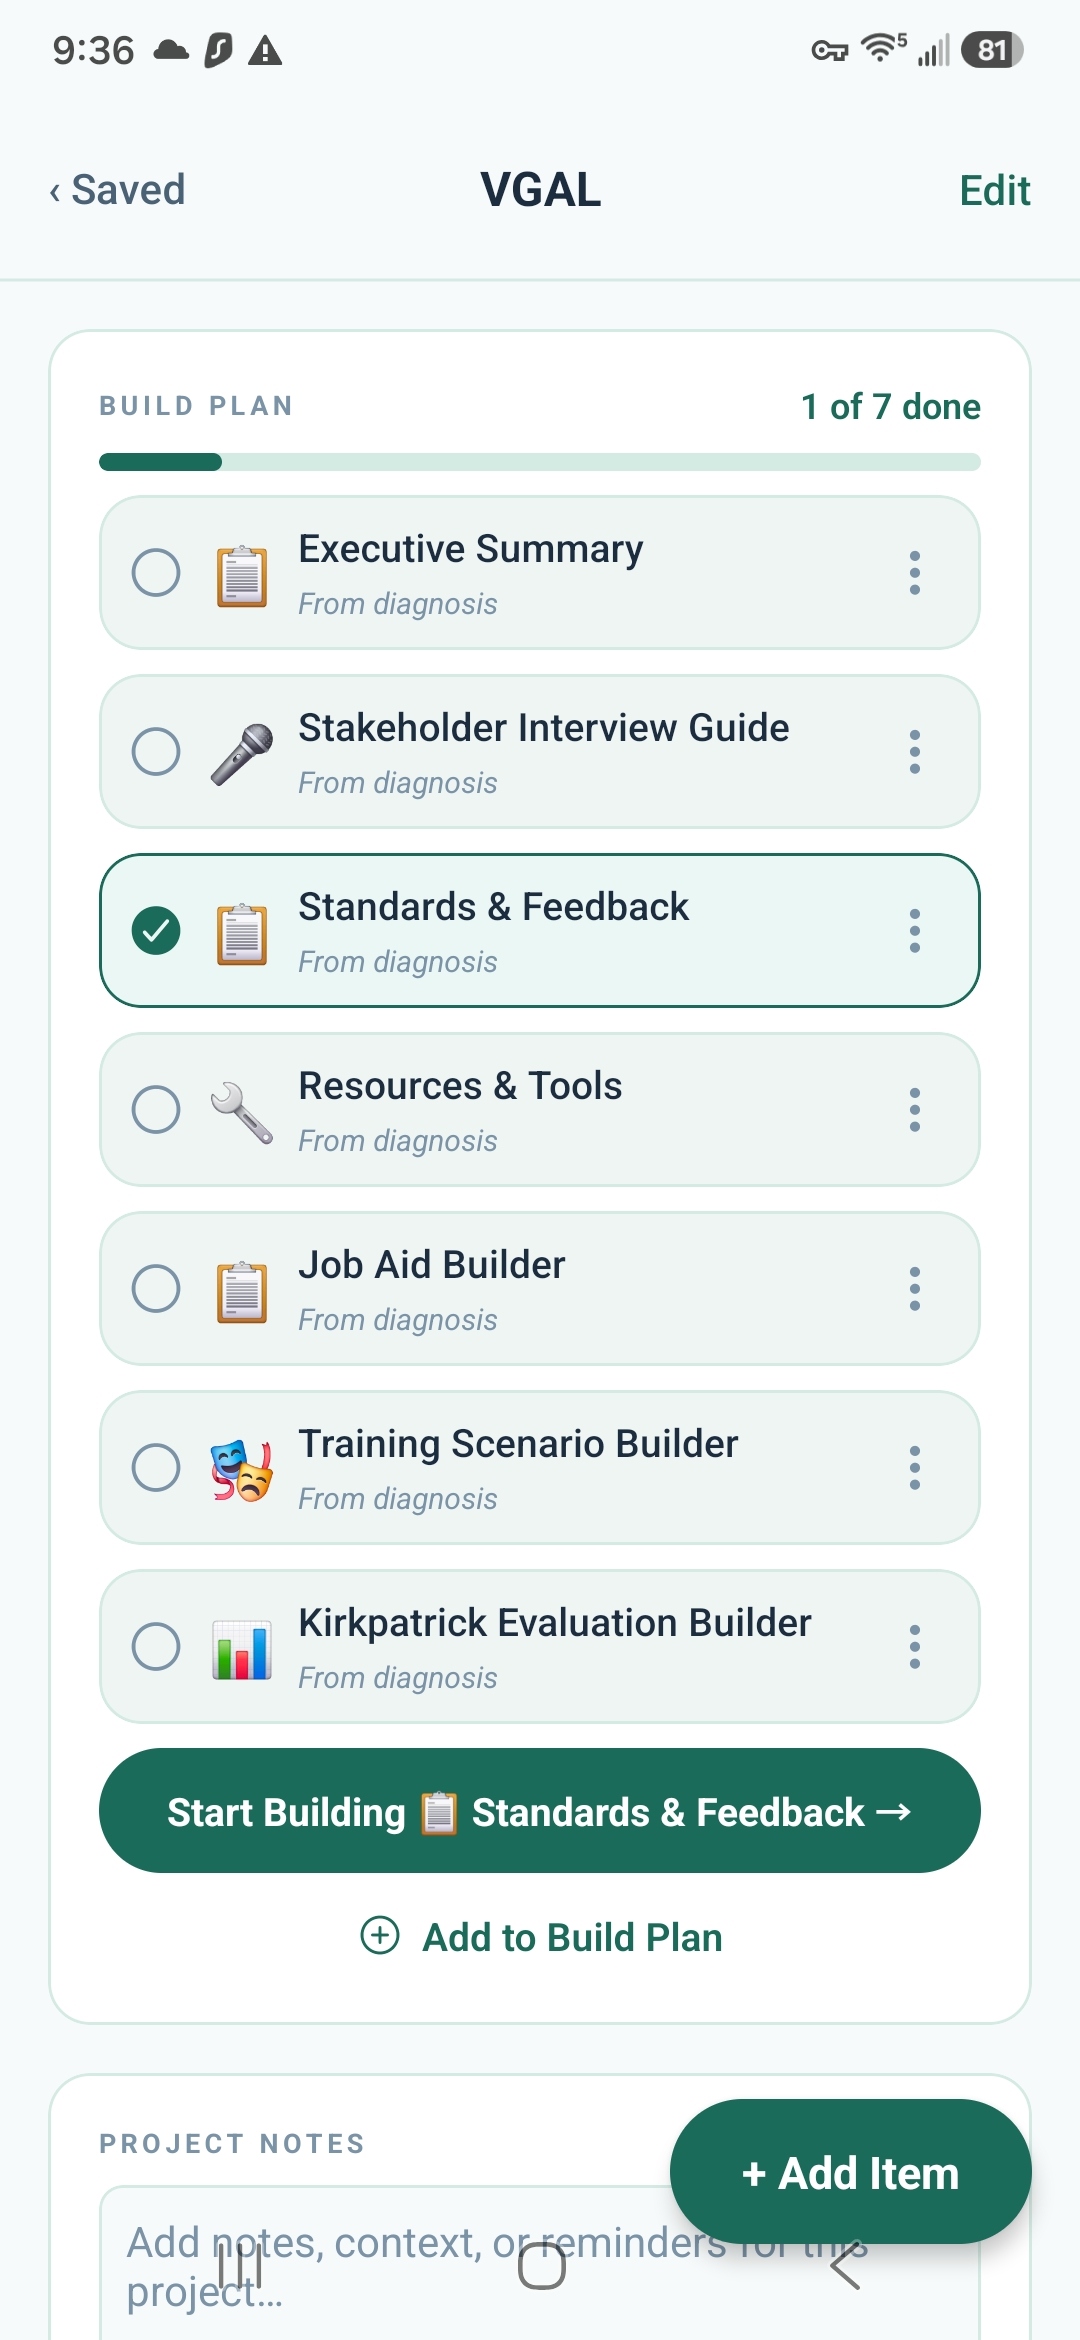
The progress bar updates as you check items off. The Leadership Brief is always inserted as the first item.
Tap the ⋮ menu on any item to open, view, move, or remove it.
Step 3Use the primary action button
The large green button at the bottom always points to the current highest-priority uncompleted item: “Start Building: Standards & Feedback →” Tap it to jump straight to the right builder without hunting through menus.
Step 4Keep it current — projects are living documents
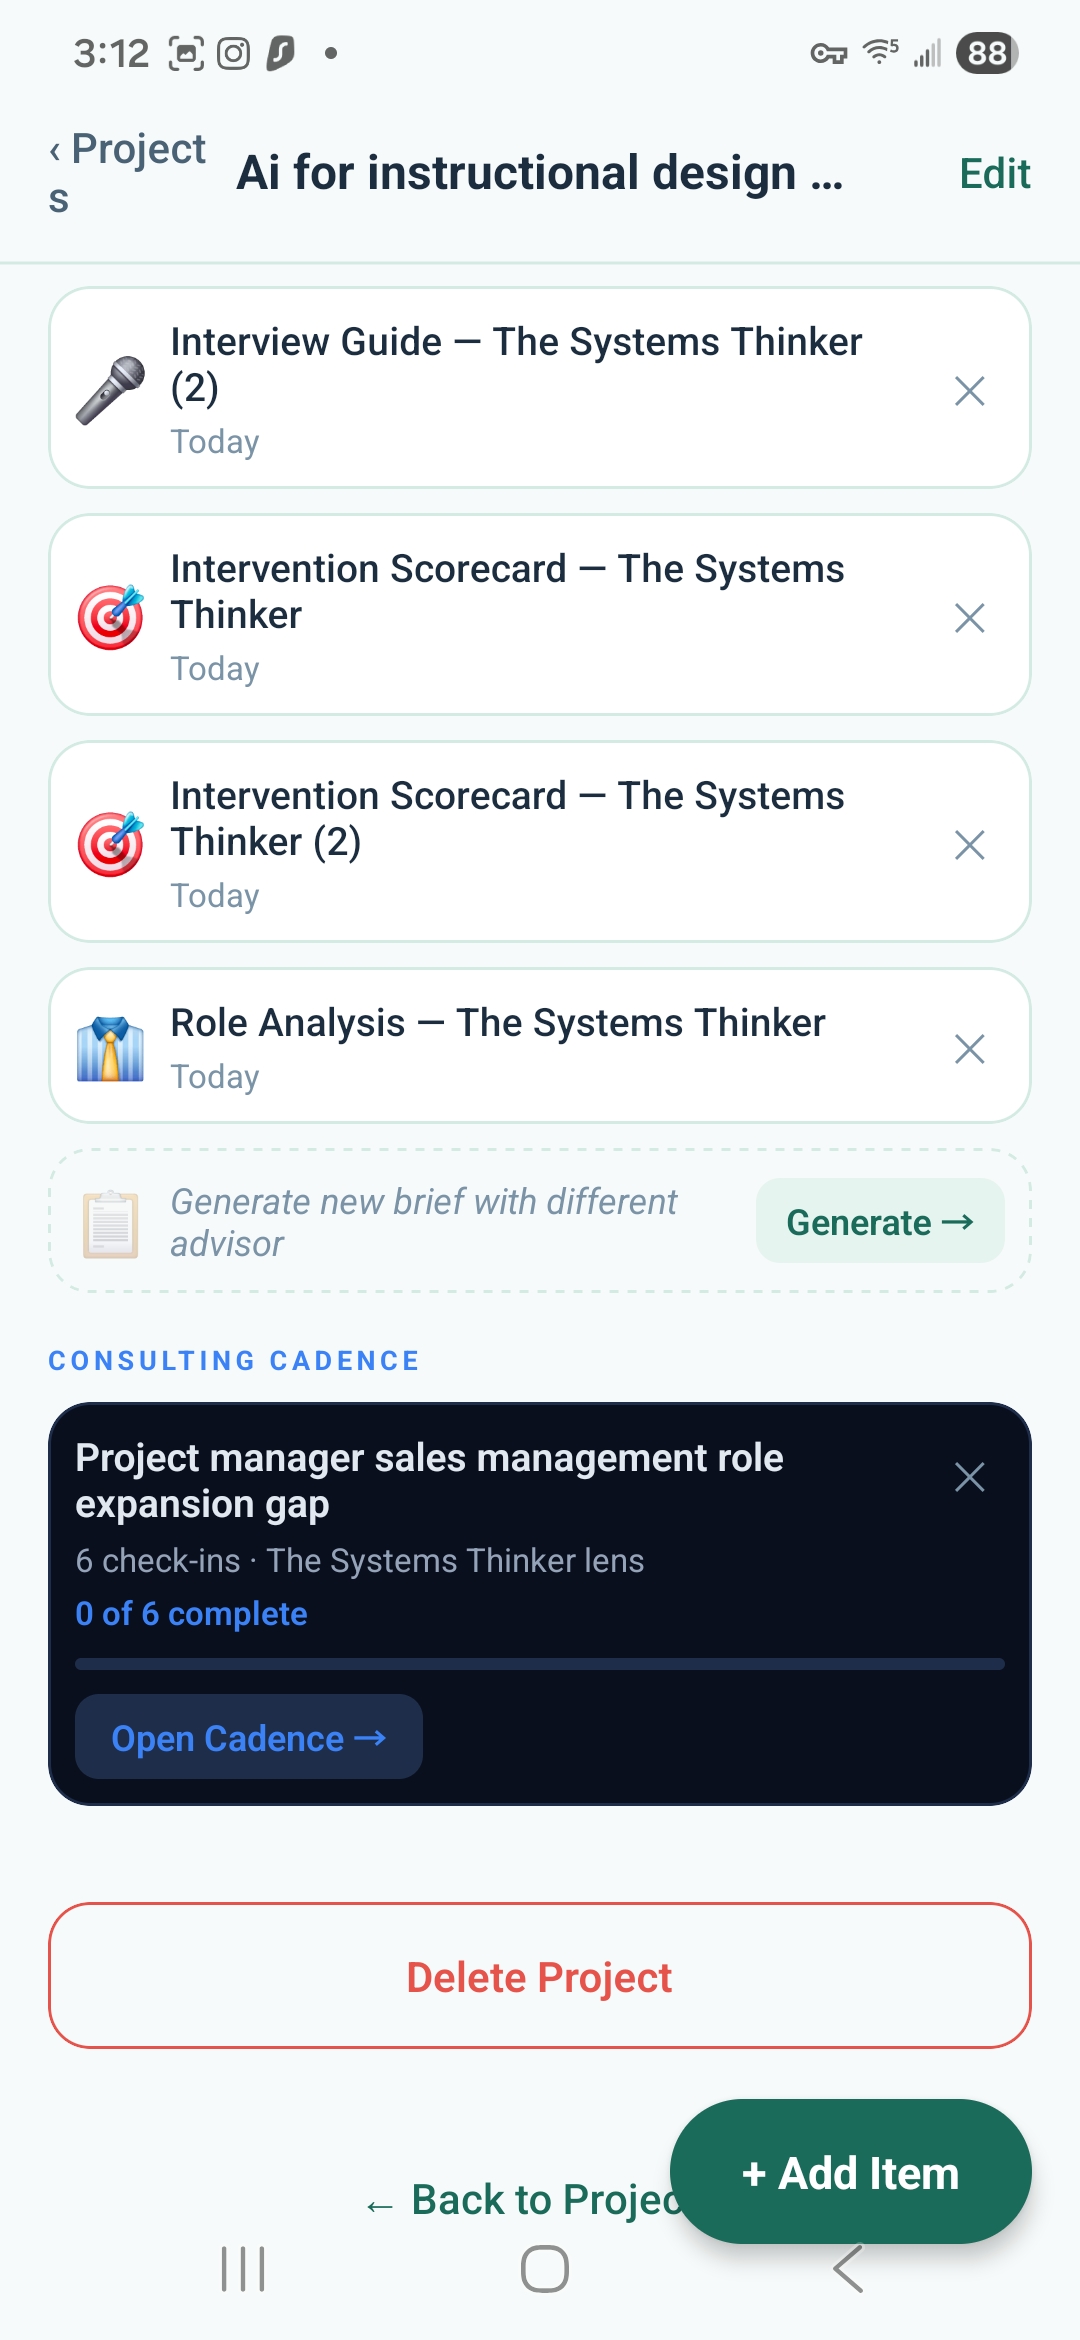
Use the Project Notes field to record what you learned in interviews, decisions made, and what’s still unresolved.
The Consulting Cadence section shows the cadence linked to this project with check-in progress. Tap Open Cadence to review the week-by-week plan.
Tap + Add Item to add new deliverables as the engagement evolves.
As you gather stakeholder interview data, run new diagnoses, and generate additional briefs with different advisor voices, everything flows into the same project. This is what a real consulting engagement looks like over time.
Your First Build
CoTrainer has 8 training asset builders in the BUILD tab. Each one pre-fills context from your diagnosis automatically — you’re not starting from scratch. ⚡ 1 spark each
The 8 training builders
Step 1Open the highest-priority item
From your project Build Plan, tap the primary action button at the bottom. The diagnosis context pre-loads automatically.
Step 2Review and refine
CoTrainer generates a first draft. Review it critically — does it reflect what you know about the actual situation? Tap Redraft to adjust tone, depth, or emphasis. ⚡ 1 spark
Step 3Check it off and move on
Mark the item complete in the Build Plan. The progress bar updates. The primary action button advances to the next item.
Environmental Interventions
When the Intervention Scorecard shows environmental factors scoring higher than training, the ENVIRON tab is where you go. These six flows address the BEM cells that training cannot fix.
Why this matters
Gilbert’s Behavior Engineering Model identifies six cells that affect performance — three environmental (Information, Resources, Incentives) and three individual (Knowledge, Capacity, Motivation). Most performance gaps have environmental causes. Training only addresses the Knowledge cell. If your Intervention Scorecard shows Performance Standards or Feedback Systems scoring 4–5, go to ENVIRON before BUILD.
The six environmental flows
How to use the ENVIRON tab
Tap ENVIRON in the bottom navigation. If you’ve run a diagnosis, you’ll see an option to pre-fill from your BEM findings. Select the flow matching your highest-scoring intervention from the Scorecard and generate.
End-to-End Walkthrough
This guide follows a real example — a volunteer organization where volunteers complete onboarding but don’t take their first case — through the complete CoTrainer workflow from first diagnosis to first build.
Step 1Open CoTrainer — DIAGNOSE tab, bottom left
Every engagement starts at the DIAGNOSE tab. Tap Guide (top right) to see the full workflow diagram before starting. For this example, choose Guided Discovery — the problem is still ambiguous.
Step 2Describe the situation to Morgan
Type: “Volunteers complete a one-day onboarding but most don’t take their first case for weeks or months. We’ve made training more engaging but it doesn’t seem to help.”
Step 3Read your diagnosis — top and bottom
Morgan produces a structured diagnosis. The confidence score tells you how much is confirmed vs. assumed. You’ll likely see a low-to-mid score here — normal for an early diagnosis. Read the Environmental cause banner carefully.
Top: confidence score + environmental flag
Bottom: Leadership Brief + Add More Context
Scroll through the full output, then tap Generate Leadership Brief.
Step 4Choose an advisor and generate the Leadership Brief
Select The Systems Thinker for your executive director — it leads with Level 4 business outcomes they’ll immediately recognize. CoTrainer generates all four tabs in parallel (60–90 seconds).
Step 5Review all 4 tabs of the Leadership Brief
Pay close attention to the 🎯 Intervention Scorecard — if Performance Standards and Feedback score higher than Training, fix the environment first. Building more training before fixing the environment will not work.
- 📋 Executive Summary — note what leadership needs to hear
- 🎤 Interview Guide — schedule 3–5 stakeholder conversations before acting on low-confidence findings
- 🎯 Intervention Scorecard — your build priorities come directly from here
- 👔 Role Analysis — understand how to allocate your time before building anything
Step 6Create the Consulting Cadence from Tab 4
Scroll to the bottom of the 👔 Role Analysis tab and tap Create Consulting Cadence. A week-by-week plan based on the role allocation — who does what, in what order, using which team member.
Tab 4: scroll to bottom for Create Consulting Cadence
The cadence: week-by-week with team member guidance
Step 7Save everything to a project
Save your diagnosis and brief to a named project. CoTrainer auto-populates the Build Plan. The Leadership Brief is always the first item — review and complete it before starting any builds.
Build Plan: auto-populated and sequenced
Project view: notes, cadence, full history
Step 8Run stakeholder interviews, then add context
Use the Interview Guide to run 3–5 conversations. Go back to the diagnosis and tap Add More Context — describe what the interviews revealed. The confidence score rises. The analysis sharpens. If the interviews substantially change the picture, re-run the diagnosis with updated inputs and try a different advisor voice.
Step 9Start your first build
Return to the Build Plan and tap the primary action button. If Standards & Feedback scored 5 on the Intervention Scorecard, go to the ENVIRON tab first — not BUILD. Fix the environment before building training. Then work through the Build Plan in order: generate, review, refine, check off, repeat.
Questions? Email jason@blueedgewater.com — we’ll walk you through it.